Use the manual exposure control in iOS 8 to come up with better photos
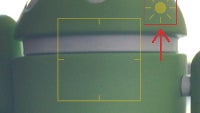
In addition to numerous exciting things, such as support for third-party keyboards, better Spotlight Search, and App Extensions, iOS 8 has also brought a rather cool and useful setting to the camera app: manual exposure. What does it do? Well, it simply lets you quickly tweak the exposure setting (those who know nothing of photography terms can think of it as 'brightness') of the camera just prior to taking the image.
The thing that makes this new feature very cool is that it's so easy to use, plus it can come in really handy when shooting in some tricky lighting situations. Let's go into a little bit more detail, though...

The iPhone has had a semi-automatic exposure setting for years now. The way it worked was: you touch the area of the photo where you want to phone to focus, and it also uses that area to set the correct exposure for the camera, so that this particular area appears fine in the image. Most of the time, this level of control would be perfectly sufficient to allow you to take a pretty nice image. However, there can be some tricky scenarios where the software wouldn't set the right amount of exposure, or when you'd feel that the image could use some brightening or darkening, despite the fact that the auto-exposure has done a relatively good job.
That's where the new manual control comes in, and it's so intuitive to use. Once you have tapped on the screen in order to set the focus and exposure, a small sun icon appears next to the focus area. From then on, you simply swipe your finger up or down to adjust the level of exposure. Once you're happy with the result, just tap the camera shutter to take the photo. Let's take a look at some examples, which prove the usefulness of this new feature!







Things that are NOT allowed: