Another day, another not-so-obvious iOS 9 feature goes under the spotlight. In the paragraphs below, we'll show you how to edit images prior to sending them. No, you don't do that in your device's gallery application. Third-party image editing apps aren't involved in this guide either. Instead, all the action happens in your iPhone or iPad's stock Mail client.
Yup, iOS' pre-loaded Mail app lets you draw on and add text labels to image attachments. You may also save your signature and imprint it onto an image or a scanned document, perhaps. Here's how you do all that.
Let's say that you've already started writing a new email and you've attached an image to it. Tap on the image – this will cause a pop-up menu to appear. Choose "Markup".
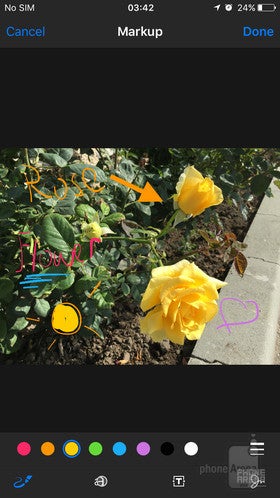
Okay, now you should be in a whole new screen with your image in the middle and a bunch of buttons at the bottom. By default, the brush is highlighted and ready to be used with a color of your choice. At this point, you are free to draw onto the image using your fingers. Note that if you doodle a shape that the app can recognize – a circle, a line, or an arrow, for example – you may have it straightened automatically. Tapping on a drawn object lets you delete it or scale it by dragging one of the blue dots that appear.
The second button in the tools panel lets you enlarge a portion of the image, as if it was under a magnifying glass. You may move the magnifying glass by dragging it around. Sliding the blue dot outward makes the magnified area larger. As for the green dot, it determines the zoom level. Again, if you tap on one of these magnifiers, you'll be given the option to delete it.
We've come to the third button in the tools menu, which is used to adding text labels. Simply tap on the label to edit it. If you tap on the "aA" symbol that appears, you'll be allowed to change the size and font of the text, as well as its justification. There doesn't seem to be a way of adding a background color, but a clever use of the brush can rectify that.
And finally, the fourth button in the tools panel is for adding your signature to the image. This might come in handy if you're sent a scanned document that you need to sign. The cool thing about the signature is that it is saved for future use.
So, that's how you edit image attachments in Mail for iOS 9. Do you see yourself using this feature often? Let us know in the comments!
A discussion is a place, where people can voice their opinion, no matter if it
is positive, neutral or negative. However, when posting, one must stay true to the topic, and not just share some
random thoughts, which are not directly related to the matter.
Things that are NOT allowed:
Off-topic talk - you must stick to the subject of discussion
Offensive, hate speech - if you want to say something, say it politely
Spam/Advertisements - these posts are deleted
Multiple accounts - one person can have only one account
Impersonations and offensive nicknames - these accounts get banned
Moderation is done by humans. We try to be as objective as possible and moderate with zero bias. If you think a
post should be moderated - please, report it.
Have a question about the rules or why you have been moderated/limited/banned? Please,
contact us.


Things that are NOT allowed: