How to put on a screen protector without applying bubbles or dust
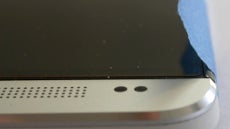
Applying a screen protector to your phone or tablet correctly is not for the faint of heart, as the procedure seems to require more patience and steady hands than your average Japanese calligrapher or rice writer. The end result is also often unwieldy, with tilted corners, and bubbles, dust or debris trapped underneath your shiny new screen protector.
To ease the procedure's pains somewhat, alternative methods for putting on your protector exist, that simply involve some masking tape, and a lot less patience than usual, while the end result is much more bubble- and dust-free.
Granted, not everyone cares about screen protection in the days of Gorilla Glass 3, Asahi Dragontrail, or sapphire coatings, but even those are inevitably going to develop scratches - from the miniature to the more significant - which would diminish the resale value of a tablet or a phone. These devices are basically all-screen nowadays, and that's where you look at most of the time spent interacting with your mobile gear, so taking a bit of time to protect your expensive toy's display is utterly warranted.
The instructions below apply for self-adhesive protectors, where the best brands like Vikuiti by 3M, or Spigen's Steinheil, cost quite a bit more than the pack of five you got on eBay for a dollar each. However, it's the more expensive ones that fit perfectly, and keep themselves smudge- and scratch-free, too, not only the handset's screen below. Thus, if applied right, they can stay on the job for the duration of your ownership, so check out Billy The Cat's excellent updated guide in the slideshow below, if you are interested.
source: BillTheCat (XDA-Devs)




Things that are NOT allowed: